 If you want to be successful on Pinterest, the first thing you need to understand is that Pinterest is a search engine and should be treated as such. A search engine with a human component.
No, Pinterest is not a social platform like Facebook and Instagram.
This is a huge mistake that many people make when setting out on their Pinterest journey.
Not using Pinterest as a search engine will make things very difficult for you to succeed on their platform.
Google is the largest search engine in the world and has been for quite some time. When you “Google” something for information, you will be given the results for your query.
Google does an amazing job in determining user search intent and will show you the best results for you based
on what you are searching for.
Well, Pinterest does the same thing. If you want to learn how to use Pinterest to promote your blog, keep reading.
The Pinterest algorithm is changing all the time, just like Google. Learning to adapt to these changes is more important than ever.
The next thing you need to know is that it will take time to grow on Pinterest. There is a ton of information online about how fast you can grow thousands of followers and get thousands of views per day on your blog or website.
Well, that’s just not the truth in most cases.
Pinterest is a long term plan and not a get rich fast plan. There are many strategies to implement and a lot of dedication and hard work involved on your end to be successful.
I just don’t want you going into this with false expectations. I will be upfront with you and tell you exactly what you should focus on to make Pinterest work for you.
Plan for the long game and you will be rewarded. Looking for a quick fix to your blogging traffic woes,
then Pinterest is not for you.
But if you stick with it, put in lots of effort and with hard work over time, Pinterest is one of the best platforms to help you get loads of targeted traffic to your website or blog.
Unlike social platforms like Facebook and Instagram, where it’s becoming more difficult all the time to get traffic without paying for it, Pinterest is still very much a viable option. You won’t need to “pay to play” on Pinterest, unlike other platforms.
Although the option to pay for success is still an option on Pinterest, it’s not necessary.
So why do I get to tell you all this information?
Well, I have been studying and working on the Pinterest platform for the past few years. I have built many websites and blogs, and now I’m using the power of Pinterest to drive traffic.
I know what works and what doesn’t. There is a Pinterest strategy that I use to be successful. This is what I will pass on to you.
Enjoy this free Pinterest marketing strategy guide!
Make it work for you!
Creating Your Pinterest Account
I know you are here to learn how to boost your blog traffic using Pinterest. So, in order to set up your account properly, you need to have a business account.
Click Here to set up a Pinterest business account.
If you already have a personal account, you can convert it to a business account. If not, then just create a business account to start. I recommend doing it this way as it will save you time and effort of switching.
Once your account is created, you will need to verify your website. You can do that by clicking the link.
I want to mention something again because it is very important. Pinterest is a search engine with a human component. From now on, when you do anything on Pinterest including creating your account, remember that. Keywords and search results are key.
Once you create your account, add your email and website url, you will be asked to select ideas that you are most interested in.

Once you do that, your home feed with be populated with pins from your topic choices.
Now it’s time to set up your profile. Select the 3 dots in the upper right corner, then pick settings.
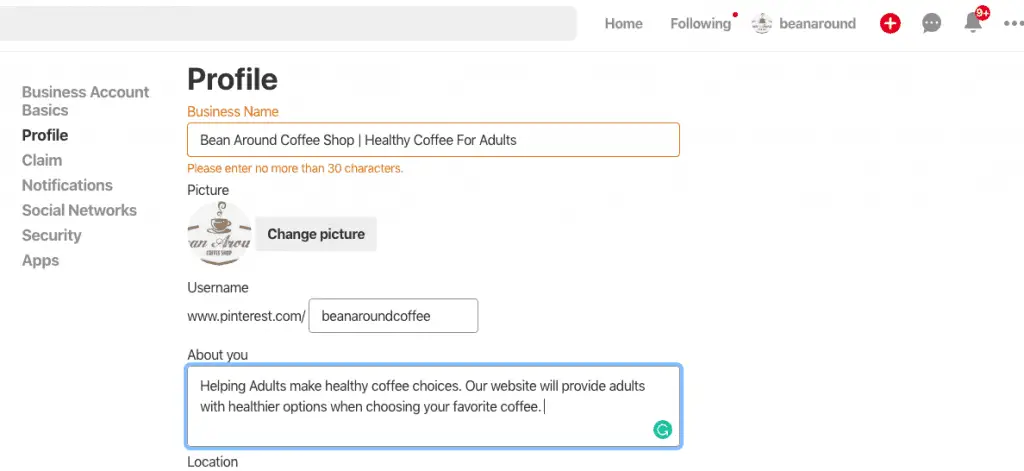
When selecting a profile name, make sure to use your business name. You are allowed up to 30 characters. I always type the name of the business with some keywords that accurately represent your business. Don’t keyword stuff. The words you use have to make sense. Notice how my keywords used above is a phrase that both makes sense and accurately describes what my business is about.
Next, select a profile picture. A company logo is fine to use. Just make sure the image is 165×165 px. Then pick a username. It can be anything you want but keep it related to your business.
The about you section should again be an accurate representation of your business using keywords where it makes sense. Again no keyword stuffing here. For example, my about you section above describes what I do while using the keywords “healthy coffee choices”. Notice I didn’t just stuff random coffee terms in the box.
As you scroll down the page, you will see the area to claim your website. This is very important as it tells Pinterest you are the authority for that particular website. Don’t skip this step.

In order to claim your site, you will be given 2 options. I find it easy to select the add HTML tag option and add it to your WordPress site. Copy the numbers and letters in the box and move to your WordPress dashboard.

For this step, I’m going to assume that you are using the WordPress platform. You can install the Yoast plugin which makes this next part easy.

Select Pinterest from the Yoast SEO social section. Then paste your code from the previous step in the Pinterest confirmation box. Click save changes.
When you return to Pinterest, click next and you will see this screen.

Click submit and you are all set. Wait 24 hours and you should get a success message with a checkmark next to your account confirming that it is claimed.
Enable Rich Pins – This is another part of setting up your account. You want to enable rich pins to show additional information from your website onto the pins.
The best way to set up Rich pins is to visit Pinterest here, then click add Rich pins to your account.
Next, go to the Rich pin validation page here. Enter your URL and click Validate.
Tip: Only enter a blog post URL or page URL, not your homepage. This is important for validation.
You will then receive confirmation that your pins have been validated. Click the “Apply now” button. Then you have to wait another 24 hours, and you will see this.

That’s pretty much it to setting up your Pinterest account. If you end up getting errors or if something doesn’t set up properly, contact Pinterest customer service and they will help you out.
Viral Pin Creation Checklist
In order to have a chance at your pin going viral, it needs to be created properly before it gets pinned.
You could do everything else right on Pinterest, but if you have a poor looking pin, it won’t go anywhere. Chances of a bad looking pin going viral are pretty much zero.
To give your pin a fighting chance, use the following checklist:
1. Pin size should be taller than wider. If you are using Canva for creating your pins, the default pin size is 735 x 1102px. Pinterest is now recommending a 2:3 ratio for pin size and 600 x 900px is now the more commonly used pin size.
2. Make sure the pin has an attention-grabbing title. Boring titles that are not interesting or say exactly what the pin is about, rarely get clicked.
3. Use Pinterest SEO. I’ll explain more on this later.
4. Use Fonts and colors that are easy to read and attention-grabbing. Most Pinterest users are on mobile, so your pin has to look amazing on mobile devices.
5. Use a logo if possible. Pin theft is huge these days, and a log will help with preventing a pin from being stolen. It also helps brand your pin.
6. Use unique images that are clear and precise. Don’t use photos that are not related to the pinned content. No clickbait. You can use free and paid non-copyright images from sources like Pixabay, Unsplash, Shutterstock, and many others. There are various sites available for stock images.
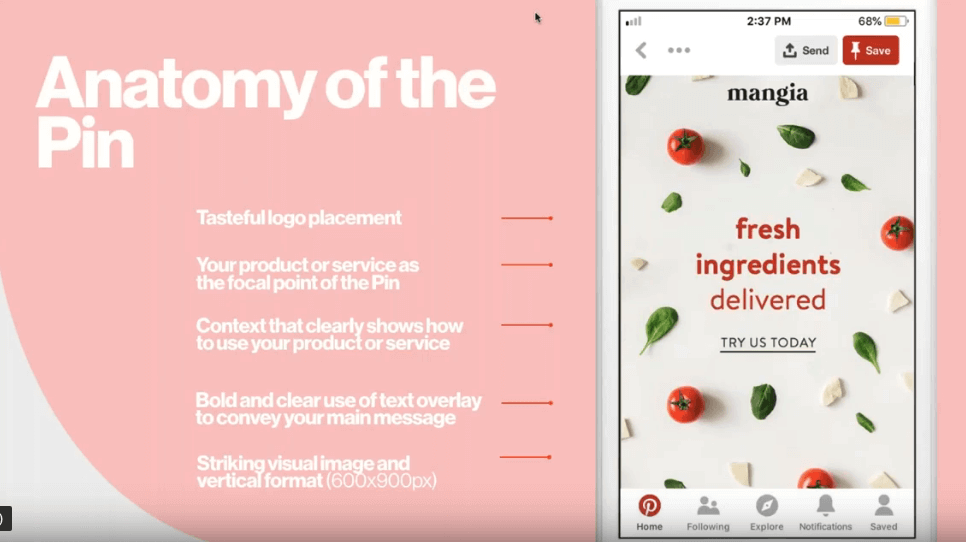
According to Pinterest, the Anatomy of the pin includes:
1. Tasteful logo placement
2. A context that shows how to use your product or service Your product or service as the focal point
3. Bold and clear use of text overlay to convey your message
4. Striking visual image and vertical format (600 x 900 px)
Make sure the pin size that you select, suits the content you are trying to display. Don’t make your pin look out of place just to satisfy that 2:3 ratio. But Pinterest is now saying that any pins that don’t follow a 2:3 ratio, could be penalized. They no longer want those very long and skinny pins that used to be popular. Like I was saying earlier, you need to adapt to the algorithm and show Pinterest you have what they are looking for.
Pinterest SEO
There are many pieces of the puzzle that you must put together to be successful on Pinterest. The biggest piece is understanding SEO and how to implement it on your pins and your profile.
So we already mentioned that Pinterest operates as a search engine with a human component. Let’s look at some examples.
Log in to Pinterest and in the search bar start to type the main keyword for your pin. In this example, let’s say you are interested in making a pin for “best coffee” and have a look at the suggested result that Pinterest shows you.
The terms that show up in the drop-down menu are what Pinterest is saying are the most commonly searched for terms that relate to your main keyword.

So let’s say we have an article on our blog that is all about coffee tables. That’s a pretty broad topic and most likely is competitive but very popular.
Millions of people search on Pinterest every day and according to the Pinterest auto-suggest, the term “best coffee tables” is a commonly-searched term. You can see other popular searched terms like “best coffee maker” and a few others. But let’s give our pin a chance to rank in the search results and actually be seen. So lets narrow it down a bit more.

Focusing on our main keyword “best coffee tables” we notice many other terms that appear in boxes below the search bar. These are other terms that are popular in the search which you can use to really focus in on a topic that is not so broad and gives you that chance to target certain visitors.
For example, you could design a pin with the title “best coffee tables for small spaces” or “best coffee tables for family rooms” If you click on the button for small spaces, you will see all the pins that relate to “best coffee tables for small spaces” and that term will now show in the search bar.
Earlier, I had mentioned that Pinterest is a great way to drive “targeted traffic” to your website. Well, this is how you do that. We are targeting people who are interested in “best coffee tables for small spaces”.
If your pin has all the proper elements and is eye-catching, people will click on it. That pin will have a direct link to your article on your blog, now it’s generating traffic. Imagine how many visitors you can get from thousands of people clicking your pins. Not only that, people will save your pins that they like, causing it to snowball into a viral pin that gets shared many many times and the resulting blog traffic can be impressive.
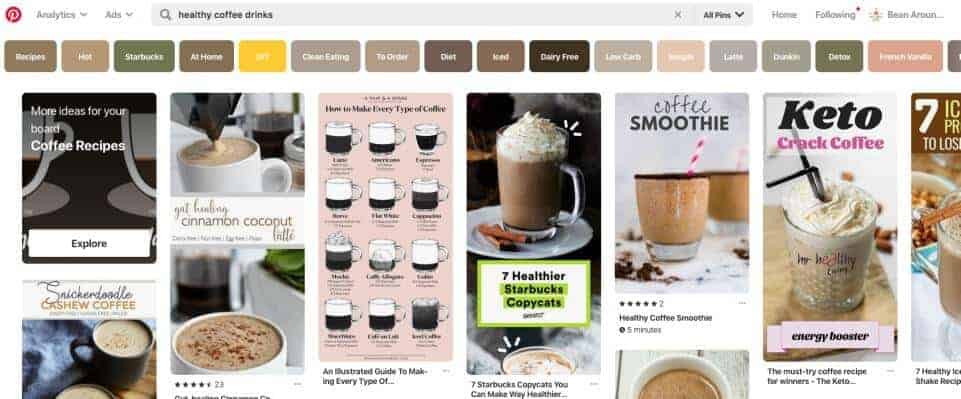
Let’s look at another example. Go to the Pinterest search bar and type “Healthy coffee” as your main keyword. You will see the following results.

Select “Healthy coffee smoothie”
You will now see all the results for that term. As before, you can narrow it down even further into “healthy coffee smoothie for breakfast” or “low carb healthy coffee smoothies” There are so many pins you can design using these keywords and many variations of those terms.

Another thing to point out. Notice the pin ranking at the top of the page with the title ” healthy coffee banana smoothie”. The main keyword is in the search bar and the term banana is in the suggested boxes below.
The pin image shows a healthy coffee smoothie and there is a banana in the image. Now is this pin perfectly optimized for SEO? Well, I don’t know without checking further into the pin description but just looking at the above keywords and seeing that it’s sitting at the top of the page, means Pinterest feels that this pin is most relevant to that search query.
* Pinterest can “see” your images on the pin. That’s why a pin related to coffee should not have some other misleading image on it.
Now let’s look at SEO for pin descriptions.
Whenever you are designing a pin title or filling out the pin description, it’s important to use the keywords from Pinterest suggest like we have been doing so far. Don’t just use words that you think are relevant.
Pinterest gives us an amazing tool to use with the search bar and we should always use that when filling out information about our pins. After all, Pinterest is basically telling us what it’s users want.
All those terms you see that show up in search, are what people are searching for the most.
So we would be crazy to ignore that and not use it in our pin descriptions.
Pin descriptions need to be exactly that. A description of your pin. As I mentioned earlier, no keyword stuffing! Let’s look at our example of healthy coffee smoothies.
A proper description for your pin could be – Looking for a great healthy coffee smoothie that is perfect for breakfast? Maybe you want a coffee smoothie with bananas? Try a coffee smoothie recipe that is great with any diet that you will love.
Catch my drift here? See how many keyword options I used without keyword stuffing? The terms breakfast, diet, and bananas all were used and they are suggested terms.
When adding a pin to your boards, you will click the + sign to add the pin. Then add your SEO title and SEO description. The pin itself can be uploaded from your computer.

SEO For Pinterest Boards
Pinterest boards are basically a place to hold your pins. So when you save a pin, you must put it in a board. I recommend that you have multiple boards which all are based around your main theme, niche, or idea.
For me, I like to have 20-25 boards. Every account is different so whatever you find covers all your main topics, is how many you should have. Within reason of course. But 25 boards should be plenty. Too many boards is confusing and just looks messy.
To add a board, click the create board box.

Keeping with the coffee theme, (I like coffee) you want to set up your boards using SEO. You could set up a board for Healthy coffee drinks for diets, dairy free coffee drinks, low carb coffee drinks etc..
I also recommend that your first board be your main board with the title of your blog or business. This is where all your pins will be saved. Your other individual boards will only be for pins that are about that specific topic.
To edit your board title and description, click on the pencil icon.

Now add your SEO board description. Detail what that board is about using keywords. I used the title Healthy coffee drinks for diets.

Just like your pin descriptions, make sure to detail what the board is about using Pinterest suggestions for SEO. No keyword stuffing here either!
Winning Pinning Strategy
I will start by saying that there is not 1 specific pinning strategy that works for everyone. I wish there was. But the truth is, everyone has a different topic and different business strategies to implement. What works for you might not work for me.
There are so many variables in determining that perfect strategy. Pinterest isn’t for everyone and not all businesses will do well on Pinterest. That goes for any platform you use. But, I do know what has worked for me, and there are things that you can do to increase your reach and become a power pinner to drive huge traffic to your blog.
Here is my strategy that has worked for me. I’m always trying new things and ideas as Pinterest changes.
Once you have your profile and boards set up, you can start pinning. I recommend if you are promoting a blog post, that you create 2-3 pins per post. So if you have 30 blog posts, make 60-90 pins.
You don’t need to do this all at once, and you should always spread out the timing for your pins. As far as the number of pins per day, that will vary. Some people have success with pinning 30-50 times per day, others it’s 15-20. For me, I found that 25 pins per day does better than 50 or more.
Creating pins does take time and if you are doing 2-3 per post it can get very time-consuming. I recommend using Canva as it is user-friendly and easy to learn. If you are using manual pinning, meaning no scheduler (we will talk about this later) then you should create a spreadsheet to keep track of your pins on a daily basis. It will get very confusing if you don’t know what pins you put where and at what time.
Once you get into a routine, it gets easier. Your best chance of success will come from pinning many times throughout the day to multiple related boards.
One thing to note here. Pinterest does not like duplicate content. You don’t want to pin the same pin over and over. Creating a schedule for each different pin will be the best thing to do.
I also find that Pinterest loves it when you are active on the platform. Meaning if you are on Pinterest throughout the day pinning your content, plus pinning other people’s content, that’s a good thing. I’m not saying that you need to pin tons of others content, but if it is relevant to your topics and adds value to your boards, then pin it. Show Pinterest you are an active member who loves to use their platform.
You really need to experiment over time as your profile grows. Remember you are in this for the long haul, there are no quick wins or instant success. If you put in the effort, you will be rewarded.
You winning pinning strategy should include setting up 20- 25 boards, 2-3 pins per post, pin 25 times per day, or more if needed.
On top of pinning, you should also follow boards and people that are in your niche. Remember Pinterest loves active users, so get involved!
Your strategy should also take into consideration how many group boards you are on, how many blog posts you are promoting, pin automation like Tailwind.
So how many followers do you need? The answer to that is it doesn’t matter. Yes, if you have more followers, your pins might get seen more and pinned more. But in my experience, the amount of followers really doesn’t relate to the amount of traffic you will get. Concentrate more on creating awesome pins and a pinning strategy and don’t worry so much about getting followers. They will come naturally.
Using Group Boards
Group boards are a great way to get your pins noticed and shared. These are boards that are created by someone, then joined by many other users to share content in hopes of getting other shares to snowball into a viral pin.
Group boards used to be a huge advantage to users in the past, and I believe they still are but not as much. I still think you should use group boards, but on 1 of my accounts, I noticed no difference in traffic between being on 25 group boards versus 0. This is something you need to experiment with.
The way to tell if the board is a group board or not is to look for a circle with the dividers in it. But I have to warn you, joining a group board is not easy. You have to be accepted by the board owner to contribute. This means sending them an email asking to join. They will want to know if you will follow the board rules, you have proper content, and agree to no spam. The owners of these boards want to make sure you are legit and will add value to the group. If you don’t follow the rules, they have no problem kicking you out.
Also, be prepared to send out a lot of email requests and get very few replies. For me, I had about 10 replies from about 100 emails. It’s a ton of work but many people say group boards are a huge part of their success so it’s worth it.

Also, make sure you are not just joining boards for the sake of joining a board. If the group board is not active, has poor content, never repins, and is spammy, then you don’t want to be there. It will actually do more harm than good. Stay away from spammy group boards. Over time, you can see the stats of what pins perform well over others, and adjust your group board strategy accordingly.
Automating Your Pins
Pin automation is an amazing tool to have. What a timesaver. So far, we have talked about pinning all your pins manually which if done right takes a lot of time and effort.
You can drastically cut down this effort and be way more organized with a pin scheduler. The only tool that I recommend you use is called Tailwind. This tool is most commonly used among Pinterest users and is approved by Pinterest. Some other automation tools may not be approved like Boardbooster, which is not around anymore.
A good way to get your account banned is to use a non approved software or tools to automate your pinning strategy.
Tailwind is a tool that I recommend you check out if you are going to be a serious Pinterest user. Although not necessary, it will save you a lot of time and effort and it gives you the advantage of joining Tailwind Tribes.
Of course, like everything, there is a strategy involved. A strategy that will take time for you to implement. But if done right, and you take advantage of everything Tailwind has to offer, you can skyrocket your Pinterest reach and overall traffic to your website.
But if you are new to Pinterest, Tailwind is definitely not necessary. Learning Tailwind is a whole other separate course in itself.
Summary
I really hope you found this information helpful. Take the time to learn how to use Pinterest to promote your blog. It is worth it to understand Pinterest and how it can work to send a ton of traffic to your blog or website. There is no doubt that the Pinterest platform is one of the best online for directing targeted traffic. It is one of the most popular used platforms in the world today and it continues to grow.
Don’t underestimate the Power of Pinterest!
Of course, there are many other topics I could go into great depth, and there are many Pinterest courses online that you can buy. I have personally bought a few and for the most part, found them to be helpful. If I can recommend any one of them it would be Pinterest Traffic Avalanche by Create And Go.
This course is by far the best Pinterest course out of the ones I have tried. It covers everything you need to know in great depth and is an all in one course. I took this course and was blown away from the amount of content and value you receive.
Check out a video from Lauren at Create And Go:
Wishing you all the best in your Pinterest success!
Some of the links on this page are affiliate links, which means we may receive a small commission if purchases are made through those links at zero cost to you. I will only sell and recommend products that I have either used personally or believe will be helpful for you. You will only see proven and trusted products, and I will help guide you away from the products that simply don’t work!
You May Also Like:


